Installation Guides
Step-by-step installation instructions for ARSTAR cultured marble vanity tops, shower wall panels, and shower pans. Proper installation ensures performance and warranty coverage.
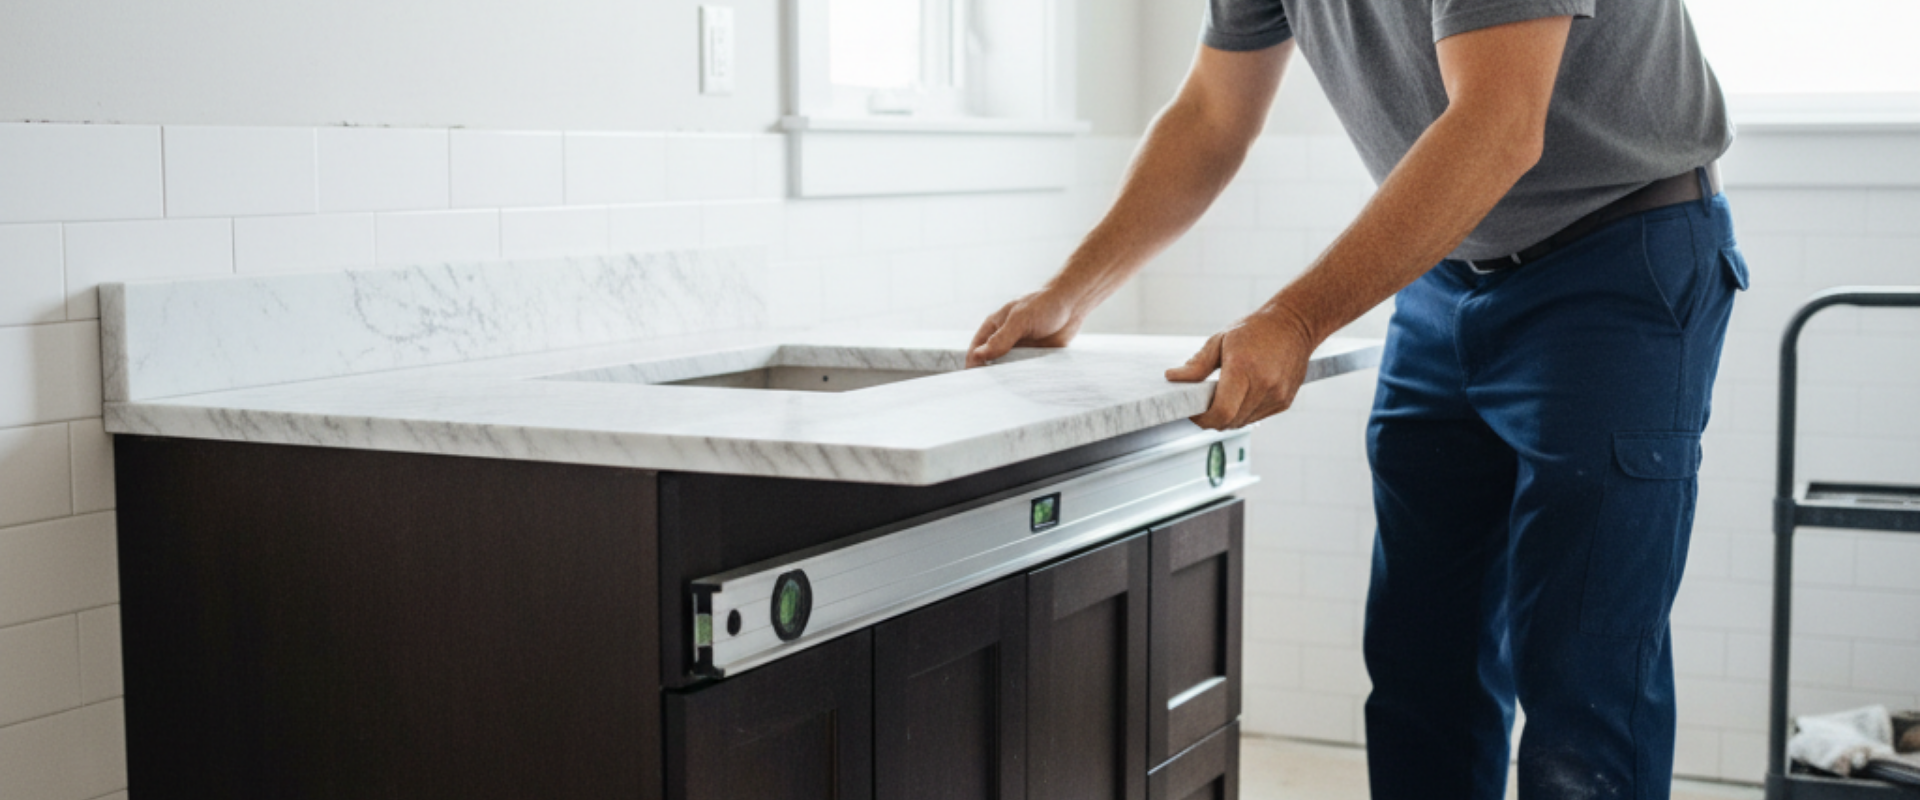
How to Install a Cultured Marble Vanity Top
This guide covers standard ARSTAR vanity top installation on a bathroom cabinet. Estimated time: 45–60 minutes. Difficulty: beginner-friendly.
Materials Required
- Clear 100% silicone sealant
- Faucet and drain assembly
- Hot and cold water supply lines
- Adjustable wrench
- Caulking gun
- Level
- Knife or scissors
- Soft cloth for cleanup
Inspect the Product
- Fully inspect the vanity top for damage or defects before installation
- Check that the model, size, and color match your order
- Report any damage immediately — warranty does not cover costs for installation or removal of a defective product after it has been installed
Prepare the Cabinet
- Shim the vanity cabinet until perfectly level
- Secure the cabinet to the wall with appropriate fasteners
- Dry-fit the vanity top on the cabinet to verify size, level, and alignment
- Confirm faucet hole positions align with your plumbing supply lines
Install Faucet & Drain
- Remove the vanity top from the cabinet
- Install the faucet and supply lines according to the faucet manufacturer's instructions
- Install the drain assembly — tighten the drain nut until finger tight
- Do NOT over-tighten — excessive force can crack the cultured marble around the drain opening
Set the Vanity Top
- Apply a continuous bead of clear silicone sealant along the back of the backsplash area
- Apply silicone along the top edges of the cabinet where the vanity top will rest
- Carefully place the vanity top onto the cabinet and press firmly into position
- Wipe excess silicone immediately with a soft cloth
- Allow silicone to cure for 24 hours before using the vanity
Connect Plumbing
- Connect hot and cold water supply lines to the faucet
- Connect the drain to the waste pipe
- Turn on water supply and check all connections for leaks
- Tighten any connections as needed — do not over-tighten
Important Warnings
- Use only 100% silicone sealant — never use Plumber's Putty on cultured marble (it degrades the material and voids the warranty)
- Do not over-tighten drain nuts or faucet connections — cultured marble can crack under excessive force
- Store vanity tops at temperatures below 95°F (35°C) before installation
- Store in upright position (perpendicular to installed position) unless fully supported by a cabinet
- Warranty does not cover damage caused by improper installation
How to Install Cultured Marble Shower Wall Panels
This guide covers ARSTAR shower wall panel installation over cement backerboard. Estimated time: 3–4 hours (plus 24-hour cure). Difficulty: intermediate — professional installer recommended.
Materials Required
- 100% clear silicone adhesive (2 tubes per 4×8 ft panel, 1.5 per 3×8 ft panel)
- Color-coordinated 100% silicone caulk for seams
- Cement backerboard (preferred substrate)
- Plastic vapor barrier sheeting
- Backerboard screws
- White primer (for backerboard)
- Level
- Pencil
- Isopropyl alcohol or acetone (for cleaning panel backs)
- Long wood braces (for supporting panels during cure)
- Cardboard sheets (to protect panel surface from braces)
Prepare the Substrate
- Remove existing drywall, greenboard, or damaged substrate down to studs
- Hang plastic sheeting over studs as a vapor barrier
- Screw cement backerboard sheets to the surround, leaving 1/8" gaps between sheets
- Apply one coat of white primer to the backerboard — gray backerboard color can show through lighter cultured marble colors
Measure & Dry-Fit
- Test-fit each panel in place, starting with the back wall panel, then side walls
- Use a level to ensure each panel is plumb and straight
- Draw a pencil line at the top edge of each panel on the backerboard as a placement reference
- Verify all three panels meet cleanly at inside corners
Apply Adhesive
- Clean the back of each panel with isopropyl alcohol or acetone to remove dust and oils
- Apply adhesive in evenly-spaced "gobs" across the wall, approximately 6–8 inches apart
- Alternative method: apply a continuous serpentine bead of silicone adhesive across the wall
- Use 100% clear silicone — colored silicone may cause discoloration on light-colored cultured marble
Set the Panels
- Install the back wall panel first, then side walls
- Align each panel with your pencil reference marks
- Press the panel firmly against the wall, smoothing with the flat of your hand to ensure full contact with the adhesive
- Leave a 1/8" gap where panels meet at inside corners
- Leave a 1/8" gap where panels rest on the shower pan edge
Brace & Cure
- Silicone adhesive requires approximately 24 hours to fully cure
- Brace each panel with long pieces of wood pressed against the panel surface
- Place cardboard between the wood braces and panel surface to prevent scratching
- Do not disturb panels during the 24-hour cure period
Seal Joints
- After cure, fill all corner gaps and pan-to-panel gaps with color-coordinated 100% silicone caulk
- Tool the caulk for a clean, consistent bead
- Allow caulk to cure per manufacturer instructions before using the shower
Important Warnings
- Always use cement backerboard — standard drywall and greenboard will degrade behind panels over time
- Prime backerboard white — gray shows through lighter marble colors and creates a dull appearance
- Use only 100% silicone adhesive and caulk — latex or acrylic caulk will fail in wet environments
- Never use screws, nails, or mechanical fasteners through the panel face — they will crack the surface
- Ensure the shower pan is installed and level before beginning wall panel installation
How to Install a Cultured Marble Shower Pan
This guide covers ARSTAR shower pan (base) installation with a mortar bed. Estimated time: 1–2 hours (plus 24-hour cure). Difficulty: intermediate — professional installer recommended.
Materials Required
- Thin-set mortar
- 1/4" × 1/4" notched trowel
- Level (at least 24" long)
- Shims (if needed for leveling)
- 100% silicone sealant
- Drain assembly
- Two 2×2 wood boards (as glides — optional)
Prepare the Floor
- The installation surface must be clean, dry, and free of debris
- Use a level to check that the floor surface is even in all directions
- If the floor is not level, float it with mortar or a suitable leveling compound and allow to dry completely before setting the pan
- Verify the drain rough-in position matches the pan's drain location (center, left, or right)
Apply Mortar Bed
- Apply thin-set mortar to the floor using a 1/4" × 1/4" notched trowel
- Spread mortar to cover the full footprint of the shower pan — the mortar must fully support the pan to prevent flexing
- Optional method: apply mortar, then place two 2×2 wood boards as glides across the mortar bed
Set the Pan
- Carefully lower the shower pan onto the mortar bed
- If using the wood glide method: set the pan on the boards, slide it into position, then pull the boards out to let the pan settle into the mortar
- Press down firmly and evenly across the entire pan surface
Level the Pan
- Place the level on the pan centered over the drain, in the direction of the threshold
- Check level perpendicular to the threshold as well
- If needed, push down on any high sides while the mortar is still workable
- Move the pan back and forth slightly to shift mortar to any low spots
- The pan must be fully level before the mortar sets — a tilted pan causes water pooling
Cure & Connect Drain
- Allow the mortar bed to cure fully before proceeding — typically 24 hours
- Do not step on or load the pan during cure
- After cure, align the drain flange on the pan with the waste pipe below
- Ensure the waste pipe extends up into the flange barrel
- Seal the drain connection per the drain manufacturer's instructions
- Install wall panels only after the pan mortar has fully cured
Important Warnings
- The shower pan must always be installed before wall substrate and wall panels
- A mortar bed that does not fully support the pan will cause flexing, cracking, and eventual failure
- Never set the pan on bare plywood or subfloor without a mortar bed — this voids the warranty
- Ensure the drain rough-in position matches the pan configuration before setting in mortar
- Do not modify or cut the shower pan — modifications void the warranty
Frequently Asked Questions
Can I install ARSTAR products myself (DIY)?
Vanity tops can be installed by a handy homeowner — the process is similar to installing any drop-on vanity top. Shower wall panels and shower pans require more expertise and are best installed by a professional contractor, especially for proper waterproofing, leveling, and drain connections. Improper installation voids the warranty.
What adhesive should I use for cultured marble?
100% clear silicone adhesive for all applications — vanity top to cabinet, shower panels to backerboard, and seam caulking. Never use latex caulk, acrylic caulk, or construction adhesive (like Liquid Nails). Never use Plumber's Putty on any cultured marble surface — it degrades the material.
Can shower panels be installed over existing tile?
In some cases, yes — if the existing tile is clean, flat, and structurally sound. Apply silicone adhesive directly to the tile surface. However, best practice is to install over clean, dry cement backerboard for the most reliable long-term bond. Consult a professional to evaluate existing tile condition.
Do I need cement backerboard behind shower wall panels?
Yes, cement backerboard is the recommended substrate. Standard drywall and greenboard will degrade over time in wet shower environments, even behind the panels. Prime the backerboard white — gray color can show through lighter cultured marble colors.
How long does silicone need to cure?
Silicone adhesive typically requires 24 hours to fully cure. Do not disturb shower panels or use the vanity during this period. Temperature and humidity affect cure time — lower temperatures and lower humidity extend the cure period.
Does the shower pan need a mortar bed?
Yes. A thin-set mortar bed is required to fully support the shower pan across its entire footprint. Setting the pan on bare plywood or subfloor without mortar will cause flexing, cracking, and voids the warranty. The mortar bed also allows final leveling before it sets.
What order should shower components be installed?
Always install the shower pan first, then wall substrate (backerboard), then wall panels. The pan must be level and the mortar fully cured (24 hours) before wall work begins. Wall panels rest on top of the pan edge with a 1/8" gap sealed with silicone caulk.
Does improper installation void the warranty?
Yes. The ARSTAR 5-year limited warranty requires that products are installed according to ARSTAR's published guidelines. Damage caused by improper installation — including incorrect adhesive, inadequate substrate, or missing mortar bed — is not covered.
Last updated: April 2026
Contact ARSTAR for Installation Help
Questions about installation, custom sizing, or technical specifications? Our team can help.